MY CRAFTING ADVENTURE

My journey through crafting collecting goodies along the way x

Wednesday, 20 January 2016

Puzzled Butterfly post continued........

Morning, didn't manage to get the photo's done yesterday after all so I have taken them this morning as the light was much better so as promised here's the cards for the next couple of classes.


 Stamps by Magenta.


Black Versafine
Clear Powder

Turquoise Pool Colour Cloud
Ink.


Blue Starlight paint.


Distress inks
Squeezed Lemonade
Ripe Persimmon


Both cards are 5x7 in size.

I have changed the colours on this card by adding in some Rose Blush and Plum Cobbler Cloud inks.


Silver Starlight paint has been added to the inked and embossed background panel with some cut n dry foam

Background coloured with Summer Sky
Colour Cloud ink.


The main image panel has been covered with Clear embossing ink and clear powder to glaze.


That's it for now see you soon.
Sheilagh


Tuesday, 19 January 2016

Puzzled Butterflies - Magenta

Good morning folks, hope everyone is feeling better as this rather nasty cold/flu virus seems to be hanging around for far too long as most of the people I know have just got rid of it or are just starting with it and I for one hope to have seen the last of it for ever lol! You Know that ain't true and I wish the weather would buck up a bit as it's not helping matters in the slightest.
In the next classes we will be using a set of stamps from Magenta by the name of Puzzle Butterflies, bet that's got you all wondering? Well this is a lovely set that you can do so much with as initially it appears to be just one large background stamp but in fact it is nine separate stamps plus an extra butterfly one, very useful this set.
I'm going to give you a quick peek for now to let you see what I mean and then I will be back later when I have taken more photos of the finished cards as the light is so terrible at the moment so pop back in a while to have a look, T T F N


I'll give you a full list of all the products I've used when I post the photo's later on today.


Wednesday, 13 January 2016

Daisy Chain Elements - Designed by John Lockwood.

Hi! Hope you are all ok this week, can't believe it's the second week of January already and I even heard someone mention this week that the Olympic Games will be starting soon What! how quick has that time gone, unbelievable. Anyway better move on seen as time won't slow down and give me chance to catch up lol!
This week I have used a stamp set from Creative Expressions - Daisy Chain Elements - designed by John Lockwood, and there are quite a few really nice sentiments on this set it has to be said which are always useful to have in your stash especially if you like me don't go big on inserts and I know that some of you prefer to have one in side your cards but I guess it's each to their own at the end of a crafting session and it matters not, what does matter is the fact that you made a card for someone in mind........ and you get to enjoy yourself into the bargain so win win. Oh dear I could go on all day but I won't instead I'll show you the cards and tell you what I used.


Colour Cloud inks
Decadent Wine
Rose Blush


8x8 Card

Here you can see I have stamped the daisy frame onto parchment in clear ink and embossed with WHITE POWDER then coloured with Decedent Wine Colour Cloud ink and a mini egg blending tool.
The die cut swirls are from Sara Davies Floral range.
Distress embossing folder from Crafters Companion.


A4 half fold card (C5)

The die cut and embossing folder is again from Sara's Signature Collection, and the ink is Turquoise Pool.

The small daisies have been stamped in black Versatfine and embossed with Clear Powder then painted with my Starlight paint.


Don't forget I used White Embossing Powder on the Daisy Frame like I forgot to put it in this photo lol!

See if you can spot the other ingredient missing from this picture I know but do you ?


Think I might add a little something extra to this card as it doesn't quite look finished to me but I'm not sure yet can't make up my mind, you will have to wait and see.


See you all soon.
Sheilagh

Tuesday, 5 January 2016

2016 - Small is Beautiful - Do Crafts


Well finally Happy New Year to you all, and I truly hope that it's going to be much better than last year as I for one have had my fill of being ill, feeling tired and sick to death of bad news and on the whole down right miserable because of it all, think it's time to make a change for the better I am so over last year and looking forward to a better one and I wish it not just for myself but for everyone who needs it....... On that note let us move forward and onto our first class of this 2016 which I must add starts on Thursday this week.
Small and beautiful is how I would describe the stamp set we will be using from Do Crafts and totally value for money with the amount of stamps you get in the set, they are just perfect for so many different projects.
I'm not going to waffle on so I'll make this post short 'n' sweet and let you see what's going to be our first class using the stamps along with some of the Colour Cloud inks and a few other bits and pieces.


I have used a couple of shades of green plus a denim blue and a purple-blue shade plus a deep pink.


Clear ink pad

Black Versafine

Clear Powder


This first card is 6x6 in size and I simply built up the design with the very pretty floral and foliage stamps.

I have used the Colour Cloud inks to stamp with and I found it best to apply the ink to the stamps with my mini egg blending tools.


Now for card two which is 8x8.

Sweet but simple by design, I decided to use a die cut shape for the main image which I have stamped a pattern onto in a random fashion. I inked through the waste from the die cut using it as a stencil to get the shadow effect under the butterfly.


The sentiment stamps are from - Sara's Signature Collection and the A4 embossing folder came with the Cut n Boss machine.


The butterfly die is by Tim Holtz.


So that's it for now see you all soon

Shelagh x

Monday, 7 December 2015

Classic Vase of Apple Blossom

Good afternoon folks, I am so pleased it decided not to rain all day today unlike the whole of the weekend when I got totally drenched more than once whilst out doing the shopping unlike some people who had the luxury of sitting in front of their TV and not having to move an inch, mentioning no names Mr. B now moving on to nicer things to talk about namely classes for this week.
I thought we might keep the floral theme going as Christmas is just about upon us and I'm hoping to get the tree up and sorted this week so before all of that this is a little look forward to the Spring even though winter has only just begun and one thing I'm sure of it's bound to get much colder before Spring is anywhere near arriving.
This week one Classic Vase Die and one Apple Blossom Stamp set both from Creative Expressions by Sue Wilson.


I'm sooooooo pleased that I have managed to get my photo's back, so far so good lol!!!


Here's a quick look at some of the items I have used, I did use a touch of my Clear Sparkle Pen mixed with my ink to paint the flowers with, I used a fine tip paint brush as some of the flowers are quite small.


You can't quite see the sparkle on the flowers in the picture.


In this photo it shows I have coloured the die cut vase with some blue Colour Cloud ink.


Cards are 8x8 and 6x6.

I have to say thanks to John Lockwood for the inspiration on the larger card with the three panel layout on.

I painted the background of the vase with Diamond Starlights paint.


I have used Shabby Shutters and Cracked Pistachio Distress inks to create the background.

This one is all me ! Really liked the background I made but you don't see the true colours in the flowers until the card is in front of you.

The sentiment is included with the Apple Blossom stamp.


As you may be able to see I have stamped and embossed the blossoms and cut them out with my craft knife and scissors before painting the flowers.

Just thought I would show a picture I took on Friday afternoon from my sister's kitchen window, squirrels feeding their little faces, there was at least six of them running a muck but I just couldn't get them all in the photo at the same time, you can stand as close as you please and they don't give a monkey's but get your camera out and they certainly know how to avoid it, typical !


See you soon  : )

Wednesday, 2 December 2015

Back to Floral with Sara Davies

Good evening sorry I've not bee able to post sooner for those of you who will be coming to class on Thursday we will be recreating a couple of the cards from demo day by popular demand and far from it be not for me to oblige, so be it. We are going to use the new Lattice and flower dies as well as a couple of embossing folders, so it will be quite an easy and relaxed class for this week, if  you managed to get any of the dies on the day then bring them with you and this will cut down on your waiting time.
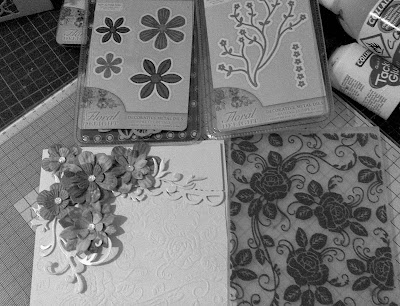
Here are a couple of photo's to give you some insight but please note that the colour of cardstock and patterned paper may vary, my pictures are shown in black and white because the lighting was so terrible and this was the best way to how them, the flowers are all cut from pink and green whilst the background is white, not sure yet as to what colour cardstock we will use for the trellis card I will decide on the day. Hope this makes some sense.

OK, despite having tried over and over and over you get the picture, well in fact that's exactly what you won't be getting for some very strange reason internet explorer won't allow me to download any photo's and I think that its something to do with my Google account so it might take me quite some time to sort it out so all I can say is sorry folks if I get it sorted in time I'll add them in later, that's the best I can do for now so see you soon, hopefully x
Sheilagh  : (


Sorry could only manage black and white photo's, the card is white on white and the flowers are in pink and green patterned papers. The flourishes have been die cut from Century Pearl Hint of Silver.

The rose embossing folder is from Sara's new Floral range and it's beautiful.


Here you can see I have used the Lattice die on one of the cards and it cuts like a dream.